2

Add The Blogger “Read More” Expandable Posts Link - Blogger Hack

20 February, 2008

This is a pretty popular Blogger hack that lots of people have asked me about. Instead of answering to each email individually, I thought it would make more sense to write an article about it.


With this hack, you can choose to display a select amount of text from the beginning of each post as a teaser instead of showing the entire post on the front page of your blog. Then when people want to read the rest of the post, they can click a “read more” link to see the full post. This is very handy if you have lots of long articles all on one page. (Note that you’ll need to have post pages enabled in order to make this feature work.)


Step #1 - Update Your Template Code


First you need to edit your existing code so I recommend copying and pasting it into notepad or any text editor. Also, it’s smart at this point to create a backup of your template just in case something goes wrong. Now do a search (CTRL + F) within the text editor for the following code post-header-line-1. This is the default code that Blogger includes but some custom templates remove or change this code so you might have trouble finding it. If you can’t locate this text then try searching for <data:post.body/> instead. Your template will for sure have this since it’s the tag that actually prints the body of your post.


Now depending on which code you were able to find will determine how easy the next steps will be. You might need to do some detective work first in order to get this working properly in your custom template. The idea is to get this new code into your template before the <data:post.body/> tag. Keep reading and hopefully the explanation will illustrate the concept clear enough so you are able to adapt this hack to your custom template.


Add the following code below the <div class=’post-header-line-1′/> and <div class=’post-header-line’> tags if you’ve got both.


<b:if cond='data:blog.pageType == "item"'>

<style>.fullpost{display:inline;}</style>


<p><data:post.body/></p>

<b:else/>

<style>.fullpost{display:none;}</style>


The result should look something like this:
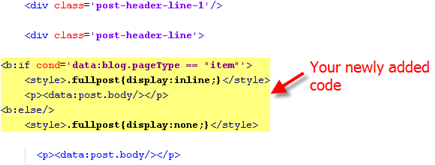

new-code-block.png


If you don’t have the default <div class='post-header-line-1'/> tag then your result should look something like this instead. This is how it would be done in the MushBlue Blogger custom template:


new-code-block-mush.png


Notice in both examples that the code in yellow and the <data:post.body/> tags are the same — it’s just tag above it that will differ based on the template you’re using.


Now let’s add one more bit of code which will actually create the “read more” link in your post. This code will go below the <data:post.body/> tag so copy the following and paste it in. Feel free to change the “Read more…” text to whatever you want the link to look like. Be careful not to delete any other code during this process.


<b:if cond='data:blog.pageType != "item"'><br />

<a expr:href='data:post.url'>Read more...</a>


</b:if>

</b:if>


Yes, there are supposed to be two </b:if> tags in the above code so don’t think it’ s a mistake. The result should look like this:


new-code-block-2.png


This code will be the same no matter what template you are using. Just make sure it goes below the <data:post.body/> as shown in the image above.


Now let’s look at what the final result should be. Here’s the updated code block you just worked on all put together:
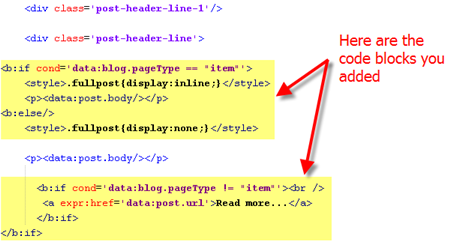


new-code-block-3.png


Ok, you’re all done editing the template code. Paste it back into your Blogger html window and save it. If you get an error, you made a mistake. The most common mistake is to accidentally delete a > or < while pasting in the new code. If it saved successfully, it’s time to move onto the next step and modify a quick Blogger format setting.


Step #2 - Add a Class Tag in Your Default Post Template


For this step, you need to navigate in your Blogger account to “Settings” => “Formatting” and scroll all the way down to the bottom. It’s the last option called “Post Template”. You’re going to paste in the following code:


<span class="fullpost">


</span>


You’ll want to keep the spaces in there which will make sense later. After you save this, it will look like this:
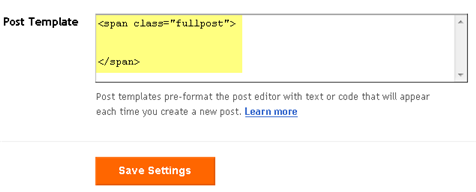

post-template2.png


Step #3 - Create a New Post


Ok, we’ve got everything all setup so it’s time to go and test it out. Hopefully you’ve got a new post in mind for your blog. If not, then we’ll just create a test post which you can later delete. When you click on the “Posting” tab, you’ll notice that the post text area is now pre-populated with the <span class=”fullpost”> and </span> tags. If not, then you didn’t save it properly so go back and re-read step #2.


So when writing your new post, anything you put above the <span class=”fullpost”> tag will be the teaser text. The main body of your post needs to go in between the <span class=”fullpost”> and </span> tags in order for the “read more…” link to work properly. See the screenshot below. Sometimes pictures illustrate better than words.
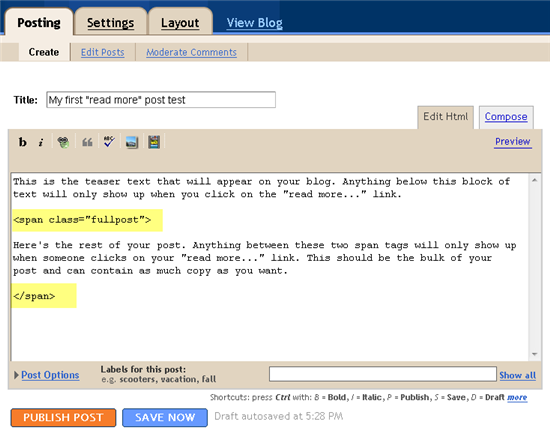


post-template-result2.png


Now publish or preview your post to see the “read more” hack working on your blog. If it doesn’t show up for some reason, go back and run through the steps again. Most likely you pasted the code blocks in the wrong places. It’s difficult to troubleshoot these issues since each template can be unique so please make sure to double-check your template before asking for help in the comments section below.


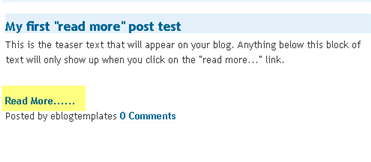
Here’s the live post with the “read more…” link properly working based on the text I used above in the post text area.

post-results.png


Additional Info


If you want to go back and update your old posts with this new “read more…” feature you can. Just go back and edit each post manually. Essentially you’ll need to paste in the <span class=”fullpost”> and </span> tags breaking apart the post into two parts.


For some posts, you might not want to use this feature at all. If that’s the case, just delete the <span class=”fullpost”> and </span> tags from within your new post text area. Then your new post will show up entirely just like it used to before you implemented this hack. Enjoy!

Thanks To - David

0

Labels into Horizontal Tabs - A Blogger Hack

18 February, 2008

Below are the instructions on how to turn "Labels into Horizontal Tabs,"

Step 0: Label your posts.

Make sure your blog has some posts with label assigned, otherwise nothing will get created. See this topic on how to create labels:

http://help.blogger.com/bin/answer.py?answer=44498&topic=9084


Step 1: Downloading and unzipping the file from the Exploding Boy website

Here are the downloading and sample links:

http://www.exploding-boy.com/2005/12/15/free-css-navigation-designs/

http://exploding-boy.com/images/cssmenus/menus.html

Then, have a googlepages account and upload the pics there.

Step 2: Changing the Header to become appendable.

Modify this line:

<b:section class="header" id="header" maxwidgets="1" showaddelement="no">

to become

<b:section class="header" id="header" maxwidgets="2" showaddelement="yes">


Step 3: Prepare the CSS portion of the hack.

Go to the very end of this article and cut the CSS portion you like there, then paste it at the very end of the CSS code (right before the closing CDATA part - see picture below)

Make sure to replace "www.yourwebsite.com" to your website.


Below is an example of pasting the code for style F:


/*- Menu Tabs F By http://www.exploding-boy.com/2005/12/15/free-css-navigation-designs/------
*/

#tabsF {
float:left;
width:100%;
font-size:80%;
line-height:normal;
border-bottom:1px solid #000;

}
#tabsF ul {
margin:0;
padding:10px 10px 0 50px;
list-style:none;
}
#tabsF li {
display:inline;
margin:0;
padding:0;
}
#tabsF a {
float:left;
background:url(" http://www.yourwebsite.com/labeltabs/tableftF.gif") no-repeat left top;
margin:0;
padding:0 0 0 4px;
text-decoration:none;
}
#tabsF a span {
float:left;
display:block;
background:url(" http://www.yourwebsite.com/labeltabs/tabrightF.gif") no-repeat right top;
padding:5px 15px 4px 6px;
color:#666;
}
/* Commented Backslash Hack hides rule from IE5-Mac \*/
#tabsF a span {float:none;}
/* End IE5-Mac hack */
#tabsF a:hover span {
color:#FFF;
}
#tabsF a:hover {
background-position:0% -42px;
}
#tabsF a:hover span {
background-position:100% -42px;
}


Step 4: Adding Label Widget

Follow the instructions from this article, especially step B.4. After you've done with inserting the code & save it, go to Page Element option and drag the newly added widget to stay under the Header area (that we fixed so that it would accomodate this new widget.)


<b:widget id='Label10' locked='false' title='' type='Label'>
<b:includable id='main'>
<div id='tabsF'>
<ul>
<li><a expr:href='data:blog.homepageUrl'><span>Home</span></a></li>
<b:loop values='data:labels' var='label'>
<li><a expr:href='data:label.url'><span><data:label.name/></span></a></li>
</b:loop>
</ul>
<!-- <b:include name='quickedit'/> -->
</div>
</b:includable>
</b:widget>


If you use a style other than F, than make sure id='tabsF' reflects the correct tab, such as id='tabsE' for style E. Later, if you like a different design, just cut-and-paste the style's CSS code, then change this id again to reflect the change.


There you have it! Well-designed tabs from professionals (The Exploding Boy website) being integrated into the new Blogger Beta.


Enjoy This hack !!!

Thanks To -
Hoctro

0

TabView In Your Blog - A widget for Blogger

17 February, 2008

Dear Friend,

Now that I have the new framework for making widgets in store, I feel confident and start trying to create a new tab widget - using labels as tabs, similar to this Yahoo! widget.


With the wonderful help of Yahoo! TabView widget, the programming time reduces quite a bit.

You can see the result from my homepage:


If you want to install this onto your blog, follow these instructions.

Step 1: Installing the core Javacript library object

First, follow the instructions from this article Hacking Technique: How To Modify a (Beta) Template, in particular section C.2 (for step 1 & 2) and B.4 (for step 3).

Next, install the latest version of the Javacsript Core Library.

Save the template.

Step 2: Installing Yahoo! Tab View requirements

Cut and paste this code below right after step 1's code (such that these code still stay before the closing </head> tag.). See instruction here if you're still not sure.


<link href='http://yui.yahooapis.com/2.3.0/build/tabview/assets/tabview.css' rel='stylesheet' type='text/css'/>


<link href='http://yui.yahooapis.com/2.3.0/build/tabview/assets/border_tabs.css' rel='stylesheet' type='text/css'/>

<script src='http://yui.yahooapis.com/2.3.0/build/yahoo-dom-event/yahoo-dom-event.js' type='text/javascript'/>
<script src='http://yui.yahooapis.com/2.3.0/build/element/element-beta-min.js' type='text/javascript'/>

<script src='http://yui.yahooapis.com/2.3.0/build/tabview/tabview-min.js' type='text/javascript'/>


<style type='text/css'>

.yui-content {
padding:1em; /* pad content container */
}

.yui-navset .yui-content {
border:1px solid #ccc;
}
.yui-navset .yui-nav .selected a, .yui-navset .yui-nav a:hover {
background-color:#fff;
}

.yui-navset .yui-nav li a {
background:#e5e5e5 url(http://developer.yahoo.com/yui/examples/tabview/img/round_4px_trans_gray.gif) no-repeat;
}
.yui-navset .yui-nav li a em {
background:transparent url(http://developer.yahoo.com/yui/examples/tabview/img/round_4px_trans_gray.gif) no-repeat top right;
padding:0.5em;
}

/* top oriented */

.yui-navset-top .yui-nav { margin-bottom:-1px; } /* for overlap, based on content border-width */
.yui-navset-top .yui-nav li a {
border-bottom:1px solid #ccc;
}

.yui-navset-top .yui-nav .selected a { border-bottom:0; }
.yui-navset-top .yui-nav .selected a em { padding-bottom:0.6em; } /* adjust height */
</style>


Save the template.

Step 3: Installing the widget

Add this code between any two "b:widget" tags, save the template, and you're almost done.


<b:widget id='HTML102' locked='false' title='MultiTab Widget' type='HTML'>
<b:includable id='main'>
<div class='widget-content'>
<!-- only display title if it's non-empty -->
<b:if cond='data:title != ""'>
<h2 class='title'
></h2>
</b:if>
<div id='doc'>
<div>
<h2>Blogging To Fame</h2>
<div class='yui-navset' id='multiTab1'/>
</div>

<!--
<div>
<h2>Hackosphere</h2>
<div class='yui-navset' id='multiTab2'/>
</div>
-->

</div>
<div id='103'/>
</div>

<script type='text/javascript'>
// Developed by Hoctro - All rights reserved 2007
// This credit must be included in all your derived usages.
var p1 = document.createElement('h6');
document.getElementById('103').appendChild(p1);
p1.innerHTML = cb.txt('TabView');

function listOneTab(json, tabView, title, act) {
var label = '';
var text = '';
var nPost = 10;

if (title == "")
label += cb.getLabelFromURL(json);
else
label += title;

text += "<div id='" + label + "'><ul>";

var numberPost = (json.feed.entry.length &lt;= nPost) ?
json.feed.entry.length : nPost;

for (var i = 0; i &lt; numberPost; i++) {
var entry = json.feed.entry[i];
text += "<li>" + "&lt;a href='" + cb.getLink(entry, "alternate")
+ "'&gt;" + cb.getTitle(entry) + "</li>";
}

text += '</ul></div>';

tabView.addTab( new YAHOO.widget.Tab({
label: label,
content: text,
active : act
}));


}

var blog1 = "hoctro.blogspot.com";
var tabView1 = new YAHOO.widget.TabView('multiTab1');
var labels1 = ['JSON Hacks', 'Label Hacks','Free Templates'];
function listTab1(json) {
listOneTab(json, tabView1, "", false);
}
function listLatestPostsTab1(json) {
listOneTab(json, tabView1, "Latest Posts", true);
}
function listLatestCommentsTab1(json) {
listOneTab(json, tabView1, "Latest Comments", false);
}

// Activating calls!

// Latest Posts
cb.search( blog1, "posts", 1, 25, 'listLatestPostsTab1');

// Latest Comments
cb.search( blog1, "comments", 1, 25, 'listLatestCommentsTab1');

// Preferred Labels
for (var i=0; i &lt; labels1.length; i++)
if (labels1[i]) cb.searchLabel(blog1, labels1[i], 'listTab1');

/*
var blog2 = "hackosphere.blogspot.com";
var tabView2 = new YAHOO.widget.TabView('multiTab2');
var labels2 = ['Neo','Widgets', "Blogger Power"];
function listTab2(json) {
listOneTab(json, tabView2, "", false);
}
function listLatestPostsTab2(json) {
listOneTab(json, tabView2, "Latest Posts", true);
}
function listLatestCommentsTab2(json) {
listOneTab(json, tabView2, "Latest Comments", false);
}
// Activating calls!
// Latest Posts
cb.search( blog2, "posts", 1, 25, 'listLatestPostsTab2');

// Latest Comments
cb.search( blog2, "comments", 1, 25, 'listLatestCommentsTab2');

// Preferred Labels
for (var i=0; i &lt; labels2.length; i++)
if (labels2[i]) cb.searchLabel("hackosphere.blogspot.com", labels2[i], 'listTab2');

*/
</script>
</b:includable>
</b:widget>


Save the template.

After you install the above three easy steps, just change these things found in step 3' code:

a. To change the title, look for this line:

<h2>
Blogging To Fame</h2>


b. modify the label tabs to become yours:

var labels1 = ["JSON Hacks", "Label Hacks",
"Free Templates", "Notable Hacks"
];

c. Change value below from 10 to any value you want for the maximum of posts per tab

var nPost = 10;

d. then replace mine with your blog's name

blog1 = "bloggingforbread.blogspot.com";


For advanced bloggers who would like to manipulate the CSS, "step 2" contains the information to do so. Also consult the Yahoo! TabView widget tutorials and examples for other variations of these tab options.


To add another tabview to this widget such as the picture below, please see part 2.


Until next time.

Thanks To - Hoctro

1 comments

Disable Right Click on Blog - A Blogger Hack

I know many Blogger don't like to get there unique content copied by any other blogger.
SO now don't worry about getting your content copied here is a solution.
By this Hack users of your blog cannot right click on your blog and your content remains safe :)

This widget is very simple to install into your blog
Following are the steps

Step 1 > Go to Template -> Page Elements.
Step 2 > Add a Page Element -> then Add a HTML
Step 3 > Now just copy and save the following code into Html and you are done !


<script language='JavaScript'>
<!--

//Disable right mouse click Script
//By Maximus (maximus@nsimail.com) w/ mods by DynamicDrive
//For full source code, visit http://www.dynamicdrive.com

var message="No Right-Click!";

///////////////////////////////////
function clickIE4(){
if (event.button==2){
alert(message);
return false;
}
}

function clickNS4(e){
if (document.layers||document.getElementById&&!document.all){
if (e.which==2||e.which==3){
alert(message);
return false;
}
}
}

if (document.layers){
document.captureEvents(Event.MOUSEDOWN);
document.onmousedown=clickNS4;
}
else if (document.all&&!document.getElementById){
document.onmousedown=clickIE4;
}

document.oncontextmenu=new Function("alert(message);return false")

// -->
</script>

Enjoy this hack !!!

0

Label Cloud in your blog - A blogger hack

14 February, 2008

To Put Label cloud or tag cloud on yours blogger sidebar template you have to follow below instruction carefully and with free mind :) This hack will really add flavour to your blogger Template and help yours readers in finding contents according to label or tags ,this features will really make you free to add many tags according to your blog post.Make sure you backup your template before making any changes!

  • Log in to your Blogger account

  • On yours Dashboard Select Layout


  • Note-You have a Label widget already Installed In your blogspot webpage where you want it (it can be moved around later)


  • Go To Edit Html


  • Then Search for the code ]]></b:skin> And Place Below Code In place of ]]></b:skin>(By Removing ]]></b:skin>)

  • Click Here To Get The Code :)

  • Now Save Template and Search for below mention label widget in blogger Html

  • <b:widget id=’Label1′ locked=’false’ title=’Labels’ type=’Label’/>


  • Atlast replace the above mention Label1 widget code with below code


  • Click Here To Get The Code :)


    And you are Done :) ,In Case Of Any problem fell free to post yours problems in Comment

    Original By - Scrapur