
Missing a real menubar on you Blog? This hack explains how you can add a simple menubar to the top of your Blog. It is in fact a simple link list, and that is a standard page element of Blogger Beta. I have added a new section at the top of the Blog Page, and the link list is inside that section. Of course there are some tricks to play, such as hiding the link list title, and showing the links list elements side by side. Here is how it is done.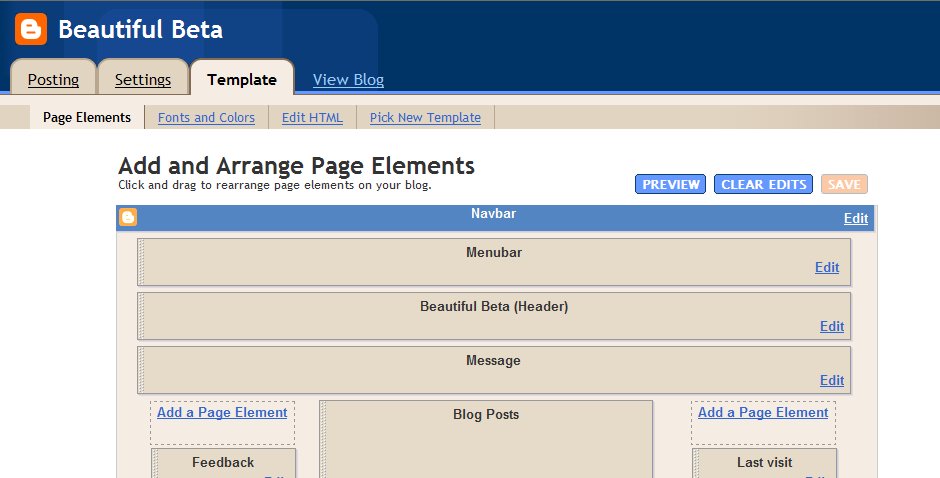
In this Page Layout you can see where I have added the Menubar. The code of this section is highlighted in red:
<div id='header-wrapper'>
<b:section class='menubar' id='menubar' maxwidgets='1' showaddelement='yes'>
<b:widget id='LinkList2' locked='true' title='Menubar' type='LinkList'/>
</b:section>
<b:section class='header' id='header' maxwidgets='1' showaddelement='no'>
<b:widget id='Header1' locked='false' title='Beautiful Beta (Header)' type='Header'/>
</b:section>
</div>
To the CSS-part of your template, add coding for the menubar-id:
#menubar h2 {display:none;}
#menubar ul {
list-style: none;
}
#menubar li {
float: left;
}
#menubar a:link, #menubar a:visited, #menubar a:hover {
padding: 5px;
display: block;
color: $headerTextColor;
}
#menubar a:hover {
background-color: $headerCornersColor;
}
The menubar title is hidden, so that only the options are visible.
The list-elements are set to none, so that there are no bullets in front of the menu options. And if a menu-option is hovered over, it is highlighted.
Original By - Ehtisham Khan-Edwardian
Add a Menu Bar - Blogger Hack
10 February, 2008
Add Signature to your Blogger Post - Blogger Hack
07 February, 2008
If u Want to Pretty Up Your Post,There Are many Things,But to Add Signature to your Blogger Post is Much Fun.Well,Below i am Showing a Tutorial How to Add a Signature to Your Blogger Post!
You must first have a signature that you want to have at the bottom of your post. This signature will be in the form of an image. To get that image, you can look online for sites that help create signatures, or you can make your own using GIMP as I did. If you need help making a signature, read some of my posts on design and graphics. After you have your signature, upload it to your web host...I use Ripway.
Open your Dashboard/ Settings/ Formatting/ Post Template. Put this code in the Post Template box:
<p><image class="centered"alt="post signature" src="SIGNATURE URL" /></p>
SIGNATURE URL
Weather Report in your Blog - Widget For Blogger
Widgetizing your Blog is the new thing to explore here on Blogger TTT. Ramani shows how to add random Einstein quotes to your Blog. Phydeaux3 started all this showing Flickr Puppies, and even Hoctro now shows a Flickr Zeitgeist widget. So it is time that Beautiful Beta follows these fellows, with a useful Weather Forecast Widget. And ofcourse a tutorial on how to create this widget on your own Blog and make it easy-to-install for your readers.
You have to follow 3 easy steps:
Step 1: Create the Widget
Go to WeatherReports.com, scroll down and click Add WeatherReports To Your Site.
In the next screen, enter your city, select the colors and style of the weatherbox. After entering all your selections, you will go to the next screen automatically. Take a look at the preview, and select and copy the HTML-code.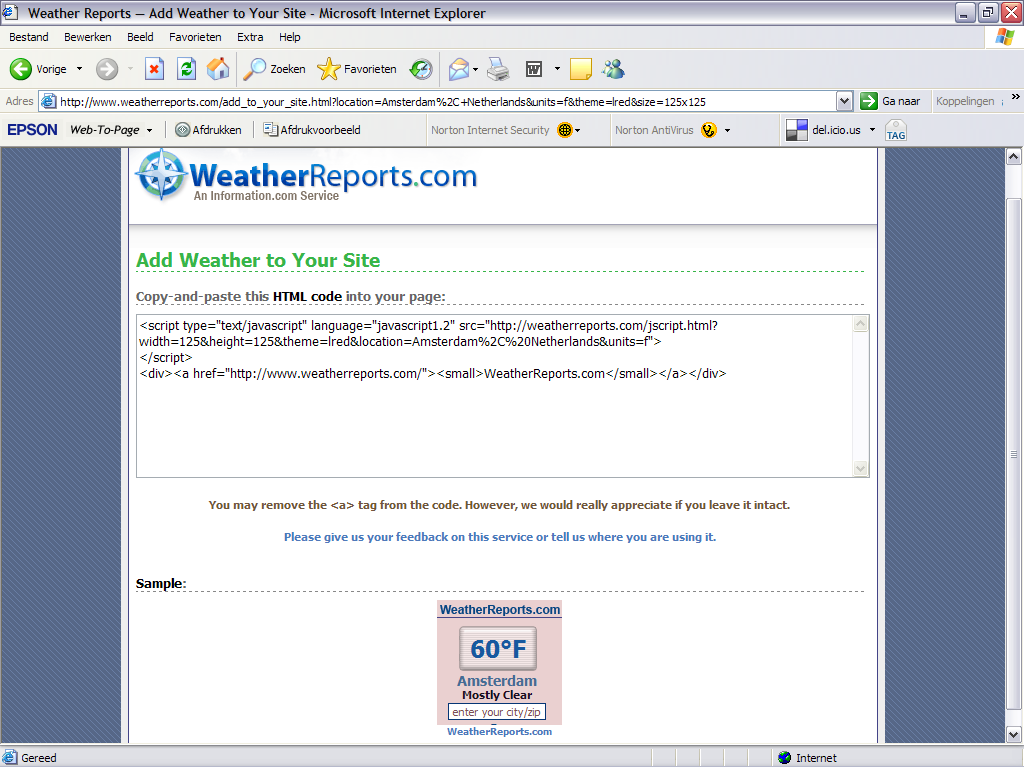
Step 2: Add the Widget to your Blog
Add an new HTML page element to the sidebar of your Blog. Paste the code that you copied into the page element, and set its title to "Weather Report". 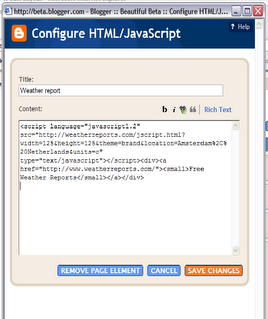
Don't save it yet, but go to step 3.
Step 3: Add an Install-button
Now we are going to add a button, that installs the widget on your visitors blog when it is clicked. In fact, we'll add a form with several input fields, but only the button will be visible. Here we go.
<form action="http://beta.blogger.com/add-widget" method="post">
<input value="Weather Report" name="widget.title" type="hidden"/>
<textarea style="display:none;" name="widget.content">
<script type="text/javascript" language="javascript1.2" src="http://weatherreports.com/jscript.html?width=125&height=125&theme=brand&location=Amsterdam%2C%20Netherlands&units=c"></script><div><a href="http://www.weatherreports.com/"><small>Free Weather Reports</small></a></div>
</textarea>
<input value="Install to Blog" name="go" type="submit"/>
</form>
The text between the <textarea>-tags is the html of your widget. Please notice that each <> is replaced with >.
Now save the page element and view your Blog.
If you want more information on how to add third-party widgets to your blog, take a look at these help pages.
Done !!!
Original - by
Change Title Of Each Post - Widget For Blogger
Guys get ready to change your title accordingly to your posts.I mean you can now have a unique title for each and every post now.This will really Boost your blogs ranking and it will help you for your blogs Search Engine Optimization.Guys please be creative so that you will get best result out of it
Now lets start to implement this into your blog.Just Follow this simple steps
Step 1-Goto Blogger Dashboard>>Layout>>Edit Html
Step 2-Backup your template
Step 3-Follow the instructions below
Find this code in your XML template{in header}
<title><data:blog.pagetitle/></title>
Now replace it with
<!-- Start Widget-based: Changing the Blogger Title Tag -->
<b:if cond='data:blog.pageType == "item"'>
<b:section id='titleTag'>
<b:widget id='Blog2' locked='false' title='Blog Posts' type='Blog'>
<b:includable id='comments' var='post'/>
<b:includable id='postQuickEdit' var='post'/>
<b:includable id='main' var='top'><title><b:loop values='data:posts' var='post'><b:include data='post' name='post'/></b:loop> ~ <data:blog.title/></title></b:includable>
<b:includable id='backlinkDeleteIcon' var='backlink'/>
<b:includable id='feedLinksBody' var='links'/>
<b:includable id='backlinks' var='post'/>
<b:includable id='status-message'/>
<b:includable id='feedLinks'/>
<b:includable id='nextprev'/>
<b:includable id='commentDeleteIcon' var='comment'/>
<b:includable id='post' var='post'><data:post.title/></b:includable>
</b:widget>
</b:section>
<b:else/>
<title><data:blog.pageTitle/></title>
</b:if>
<!-- End Widget-based: Changing the Blogger Title Tag -->
Further more you can add a very good keyword in homepage's title by just adding Keyword + Blog Title by finding this line in the above code{3rd last}-
<b:else/>
<title><data:blog.pageTitle/></title>
</b:if>
and adding keyword here
<b:else/>
<title> <data:blog.pageTitle/>Keyword</title>
</b:if>
Done !!!
Original -
Add Favicon - Widget For Blogger
04 February, 2008
Favicon is known as favorite icon for a your blog or site. Adding a Favicon to your blog is a good way to distinguish your blog from the millions of other blogs.
Below is Screen Shot of my Favicon so that you can know what Favicon exactly is :-
Ok now you what Favicon is now let see how to add it into your Blog or site. I have seen many procedures of adding Favicon. I will tell you the simplest method to add it
Here we go...
Step 1> step 1 is choosing you Favicon it may be in any format like JPG,JPEG,PNG Etc. Just save that Image which you like into your hard drive.
If you have problem in finding Favicon then simply go to google images and type the keywords like Favicon or icon or anything you want as Favicon (Be Creative).After saving your image file into your hard drive go to step 2
Step 2> Now you need to create the .ico file of that image file which you saved into your hard drive. For making .ico file of any image file i use Html-Kit.com. After opening there site you just need to upload you image file there and they convert you image file into .ico format then you just need to download it and step 2 is Done !
Step 3> Now time to upload your .ico file to any hoster like Google pages. After uploading your .ico file get the path of that image file - http://Bloggingforbread.googlepages.com/favicon.ico now after getting the path move to Step 4
Step 4> Now login to your blog and go to the Edit Html tab from Template. Then paste the following code below <head>
<link href='http://youraccount.googlepages.com/myicon.ico' rel='shortcut icon'/>
<link href='http://youraccount.googlepages.com/myicon.ico' rel='icon'/>
Before pasting this code to your blog's Html just exchange both the line - http://youraccount.googlepages.com/myicon.ico
with your .ico files path
That's It you are Done !
If you have any type of problem adding Favicon to your Blog fell free to ask here by commenting.
Happy Blogging !!

